
The best FREE patterns so WONDERFUL people like YOU can create and SHARE!
Please let us know about any broken links that you find. THANKS
|


In This Section
AllCrafts
Crafts
Sections
Shutterfly Online Photos Review
Page 1 | Page 2 | Page 3 | Page 4 | Printable Version
View and Enhance
Now that you have some photos in Shutterfly, you can do alot to make them better. If you're using the Shutterfly Express Software, these functions are available within the software. You do not need to be online to use the software. Let's look at how to edit your photos on the Shutterfly website. Once logged in there, click the View and Enhance tab at the top of the screen. Choose an album to work with. The photos are shown in a grid of small photos, so you can see many at once. Each has a checkbox underneath. To select that photo, make sure the box is checked. In this area, here's what you can do with your photos:
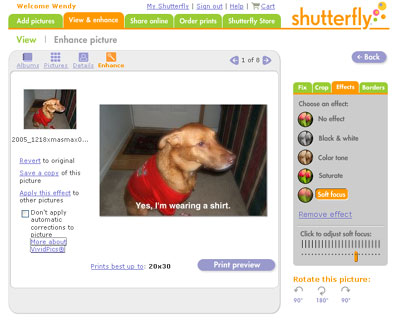
In the main View window, you can change the size of the thumbnails using the buttons at the bottom for Small, Medium, and Large. At the top of the page, there's a Find button. Search for photos by date taken or uploaded, for photos marked Favorites, by text ( filename, caption, or description), and whether you've used the photo in a print or gift order. To work with a photo, I usually click it or the Details button at the top. This will give you info about the photo. I like how it tells me what size the photo will print best. Enhance and Fix PhotosLet's have some fun! I recommend that you fix and crop your photo first, then add effects and borders. In the right-hand column, go to the Fix tab. This is a tool to help you correct red eye in your photos. Follow the 3 steps to select and correct the red parts. In the first step, click on a red-eye in the main photo. You'll see a close-up of the eye in the small preview on the right. Next, it will ask you to click the red area in the preview window. Then it will color-correct the red pixels out. If the effect isn't right, click a slightly different part of the red pixels. Next, we crop! Cropping a photo cuts away part of your photo, around the edges. It removes distractions that interfere with the focus on your subject. Removing distractions from your subject can improve the picture dramatically. The Shutterfly Crop tool makes it easy to see the effect. To see your cropped photo, change the amount and space removed with your mouse. The frosted area around the edges will be removed. The default tool is the EasyCrop tool, which helps you crop your photos to standard print sizes. If you know that you will print an image as an 8x10, then choose that option, and it will keep your photo within that proportion. Click the custom crop tool if you want to crop without a fixed ratio. You may have a white border around the photo when you print them, to fill in the space. Time to enhance! There are a few special color effects in this area. Used wisely, they can add to your photos and their story. In the screenshot here, I've added Soft Focus to highlight the facial expression on my dog, Max. The background was irrelevant to the image, and soft focus blurs it slightly. You may have noticed - I jumped ahead and added a caption. I couldn't wait to write down what he was saying to me. We'll go there, next.
Let's recap the Effects section:
Most effects have adjustments to help you get just the right look. In the left-hand column of this page, there are some useful links. You can see them in the image above. Revert to original removes everything that you've done to the photo. Save a copy when you've made a change you'd like to keep. You can save edited images to a new album to stay organized. Apply the same effect to other pictures in the same album - a great timesaver. Shutterfly automatically corrects all photos, but if you've already corrected the image in another program, check the box at the bottom, and it will not change it. Next stop - Borders. In the right-hand column, click the green tab for Borders. Here's where you can go crazy - borders and more borders. There are hundreds of borders. The drop-down box shows you the first few dozen categories. To see the rest, choose the last option, More... Many of the borders are themes - holidays, thank you, seasons, moving, parties, sports, patterns, and even calendars. Other borders are edges and captions. Edges add an effect to the outer edges of your photo. They add a rough look or a soft blur or an elegant edging - lots of choices. Captions let you add a title or comment to your photo in the frame or on the photo. Some captions can be combined with some edges, I noticed. You'll have to try different combinations to set off your photos. Share Photos Online
|
|
Search AllCrafts.net |

Freebies
Download Free Fonts!
Subscribe to our newsletter
Thanksgiving Crafts | Christmas Crafts | Valentine's Day | Mother's Day Crafts | Father's Day Crafts | Earth Day Crafts | Easter Crafts | April Fool's Day | Back To School Crafts | Halloween Crafts | Holiday Crafts
Angel Crafts | Baby Crafts | Basketry | Beading | Candle & Soap Making | Computer Crafts | Crochet | Knitting | Doll-Making | Drawing & Painting | Family Tree | Felt Food | Felt Flower | Floral | Gardening Crafts | Greeting Cards | Jewelry & Beading | Kids Crafts | Preschool Printables | Locker Hooking | Nail Art | Nature Crafts | Needlework | Owl Crafts | Painting | Paint Chips | Patriotic Crafts | Pennants & Buntings | Plastic Canvas | Quilting | Rubber Stamps | Scrapbooking | Sewing | Shoe Crafts | Silhouette | Soap Making | Tatting | Wedding Crafts | Woodworking
Home | Sitemap | Email | Newsletter | Advertise
...