|
How to do Everything on Shutterfly
Highlights of Shutterfly
Easy to join
15 free prints for new members
Print photos and mail them to family and friends
Add personal messages to the back of each regular-size print
Add digital photos to cards, gifts, and calendars
- Prints
- Greeting Cards
- 4×8 Cards
- Note Cards
- Hardcover Photo Books
- Mugs
- Calendars
- Snapbooks
- Aprons
- Mouse Pads
- Magnets
- T-Shirts
- Coasters
- Tote Bags
Share and Edit Digital Photos Online
- Free unlimited secure photo storage
- Store, edit & share photos online
- Use photo albums, keywords to organize your photos
- Free software to upload and edit photos
Coupon Codes
New member special offer:
Get 15 free prints, plus buy 1 Photo Calendar, get the second at 50% Off. (Expires 11/25/06)
Save 15% on professional-quality prints! Use Coupon Code: AFF1-SAVE (Expires 1-31-06)
Getting Your Photos Online
Shutterfly was easy to join. The site logged me in after a short form, and took me to the Add Photos page. There are a few options for adding your photos depending on where you have them- film, computer, or cds, and how you'd like to send them - mail, at their website, from within your web browser or using their free software. They're all pretty easy, and I discuss each one in detail below. was easy to join. The site logged me in after a short form, and took me to the Add Photos page. There are a few options for adding your photos depending on where you have them- film, computer, or cds, and how you'd like to send them - mail, at their website, from within your web browser or using their free software. They're all pretty easy, and I discuss each one in detail below.
Mailing your film to Shutterfly
If you have 35mm or APS film rolls or single-use cameras, you can send them to Shutterfly using their postage-paid film mailers. They will develop your film, mail you the negatives, and put your photos online, for $3.99. You can order prints at any time. To order the mailers, log-in to your account and click the Add Photos tab at the top of the screen. On the right-hand side, there's a text link for Order Film Mailers. On the next page, fill out the form to order them. They also have deals on prints packages, too.
Mailing a CD of photos to Shutterfly
Shutterfly will upload an entire cd of photos to your account free! Great if you have a lot of photos on your hard drive. The service is free - you pay postage to mail the cd. It takes a few days, and they do not return the cd. Be sure to keep copies on your hard drive or another cd. Shutterfly provides all the info on how to send your cd. After you log-in to Shutterfly, chose the Add Photos tab at the top. In the right-hand side, click the link for Mail in a CD.
Web Browser Upload
From your web browser, either Internet Explorer or Firefox, you can upload images one at a time. Click on the Add Photos tab, and, choose or create an album. An album is a handy way to organize your photos. It is simply a group of photos. I like to create albums by date - Fall 2005, 1980's, or by theme - graduation, wedding.
After creating or choosing an existing album, click Next in the upper right hand side of the page. On the following page, there will be spaces for 10 photos. Click Browse next to each space to pick a photo to upload. The photos must be in jpeg format. They usually have a .jpeg or .jpg at the end of the name.
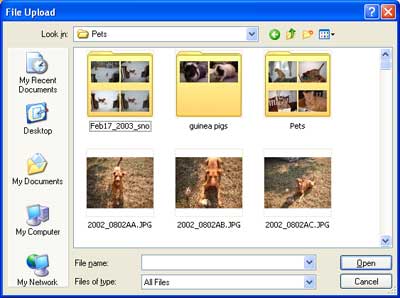
Typically, your photos are located in My Documents in the My Pictures folder. Browse to the folder and pick each photo. While you are browsing for a photo, you can change the way they are displayed. I like to see them in thumbnail mode to make it easier to get the right ones.
While you are in the File Upload box, click the little down arrow and choose Thumbnails. See this image -- CLICK HERE-- shows you where to find this option.
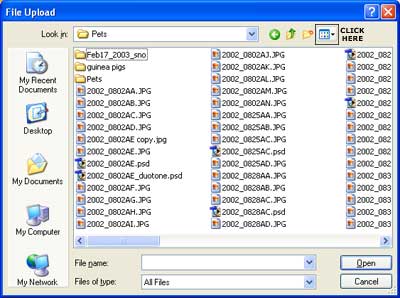
Voila - instead of file names, you will have small images showing your photos.
After you've selected your photos in each space, click Add Now. Shutterfly will transfer the files. The speed depends on how you are connected to the Internet. I uploaded 8 photos in just a few minutes.
This option is quick and easy, but best for just a few photos at one time. If you have many photos on your computer, try the browser plug-in or software. Each has more options and can do many photos at once.
Web Browser Plug-ins
The Picture Upload Assistant works with your browser such as Internet Explorer, Netscape, or Firefox. When I visited Shutterfly with Internet Explorer, it was simple. After I logged in, I clicked the Add Photos tab. The Picture Upload Assistant installed automatically. There are 2 methods to add photos - drag and drop & browsing for files.
First, if you have a folder open on your computer that contains photos, drag and drop them onto the area with Shutterfly circles on it. It is in the middle of the page. If you use your Shift or Control buttons on your keyboard along with your mouse, you can select many photos at once.
Otherwise, click the Choose Pictures button. It will open up a box to browse your computer. You can select your photos by clicking on them. Near the bottom, there are links to select All or None. Very handy.
In the Firefox browser, I found the Upload Assistant when I went to add pictures. On the page that has space for 10 images, there's a link in the right-hand side, "Get the Picture Upload Assistant." On the next page, the download started automatically. I saved it to my computer. There are install directions on the download page. Close Firefox and double-click the file you just downloaded.
It will open an install program. Follow along and click the Next button a few times. Once done, it opened Firefox again. There's a link in the page to go back to Shutterfly. I signed in and returned to Add Photo. The new plug-in works just the same as in Internet Explorer, where you can add multiple photos by drag and drop or by selecting them.
Here's a tip - If you'd like to get back to the beginning at Shutterfly, click the link for My Shutterfly near the top of the page. It has all of your albums and everything else in one easy-to-find area.
Shutterfly Express Software
Shutterfly offers free software that does alot:
- Copy photos from your digital camera
- Review and edit your photos - crop, red-eye reduction, etc.
- Upload your photos to albums to share online
- Order prints from within the software
The free software is available from almost any page at Shutterfly. At the bottom of the page, there's a link to Free Software. I also saw a link on the right side of the page while in Add Photos. Follow the directions on the page to download and install the software.
Shutterfly Express can be set to automatically open open jpeg photos and open the software when you plug your camera into your computer. During installation, make sure the boxes for those options are checked.
After installing, the program opened up automatically and showed a great quick-start guide. I recommend going through these opening screens to learn all that the software can do with your photos.
The software is great, and has lots of options. You can edit your photos and fix them. Then you can upload them to Shutterfly or even create a screensaver. Fun!
Next, we'll organize our photos, fix 'em up and add effects. Ready?
|
View and Enhance
Now that you have some photos in Shutterfly, you can do alot to make them better. If you're using the Shutterfly Express Software, these functions are available within the software. You do not need to be online to use the software.
Let's look at how to edit your photos on the Shutterfly website. Once logged in there, click the View and Enhance tab at the top of the screen.
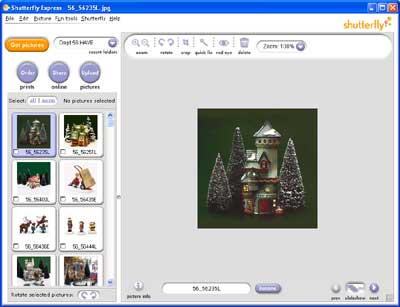
Choose an album to work with. The photos are shown in a grid of small photos, so you can see many at once. Each has a checkbox underneath. To select that photo, make sure the box is checked.
In this area, here's what you can do with your photos:
- View as Slideshow
- Enhance and Fix Photos
- Edit Titles and Descriptions
- Organize Photos
- Delete Photos
- Rotate photos
In the main View window, you can change the size of the thumbnails using the buttons at the bottom for Small, Medium, and Large. At the top of the page, there's a Find button. Search for photos by date taken or uploaded, for photos marked Favorites, by text ( filename, caption, or description), and whether you've used the photo in a print or gift order.
To work with a photo, I usually click it or the Details button at the top. This will give you info about the photo. I like how it tells me what size the photo will print best.
Enhance and Fix Photos
Let's have some fun! I recommend that you fix and crop your photo first, then add effects and borders.
In the right-hand column, go to the Fix tab. This is a tool to help you correct red eye in your photos. Follow the 3 steps to select and correct the red parts. In the first step, click on a red-eye in the main photo. You'll see a close-up of the eye in the small preview on the right. Next, it will ask you to click the red area in the preview window. Then it will color-correct the red pixels out. If the effect isn't right, click a slightly different part of the red pixels.
Next, we crop! Cropping a photo cuts away part of your photo, around the edges. It removes distractions that interfere with the focus on your subject. Removing distractions from your subject can improve the picture dramatically.
The Shutterfly Crop tool makes it easy to see the effect. To see your cropped photo, change the amount and space removed with your mouse. The frosted area around the edges will be removed.
The default tool is the EasyCrop tool, which helps you crop your photos to standard print sizes. If you know that you will print an image as an 8x10, then choose that option, and it will keep your photo within that proportion. Click the custom crop tool if you want to crop without a fixed ratio. You may have a white border around the photo when you print them, to fill in the space.
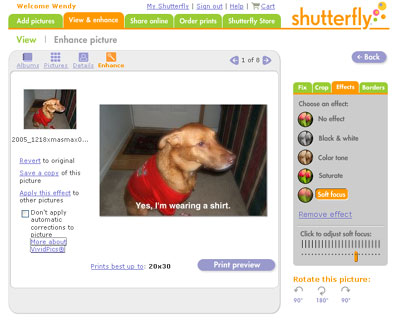
Time to enhance! There are a few special color effects in this area. Used wisely, they can add to your photos and their story. In the screenshot here, I've added Soft Focus to highlight the facial expression on my dog, Max. The background was irrelevant to the image, and soft focus blurs it slightly. You may have noticed - I jumped ahead and added a caption. I couldn't wait to write down what he was saying to me. We'll go there, next.
Let's recap the Effects section:
- No Effect - use this to remove effects
- Black & White - great for a special event album
- Color Tone - add sepia tint or any other color
- Saturate - makes your colors more vivid
- Soft Focus - softly blurs the background and adds subtle focus
Most effects have adjustments to help you get just the right look.
In the left-hand column of this page, there are some useful links. You can see them in the image above.
Revert to original removes everything that you've done to the photo.
Save a copy when you've made a change you'd like to keep. You can save edited images to a new album to stay organized.
Apply the same effect to other pictures in the same album - a great timesaver.
Shutterfly automatically corrects all photos, but if you've already corrected the image in another program, check the box at the bottom, and it will not change it.
Next stop - Borders. In the right-hand column, click the green tab for Borders. Here's where you can go crazy - borders and more borders. There are hundreds of borders.
The drop-down box shows you the first few dozen categories. To see the rest, choose the last option, More... Many of the borders are themes - holidays, thank you, seasons, moving, parties, sports, patterns, and even calendars.
Other borders are edges and captions. Edges add an effect to the outer edges of your photo. They add a rough look or a soft blur or an elegant edging - lots of choices. Captions let you add a title or comment to your photo in the frame or on the photo. Some captions can be combined with some edges, I noticed. You'll have to try different combinations to set off your photos.
Share Photos Online
Create a place online where you friends and family can view your photo albums. Choose the Share Online tab at the top of the page. Click here to go to Share Photos at Shutterfly.
You can view your photos by album or thumbnails. All of the tools for enhancing your photos are available here. It's great to design an album and then work on the photos, too. When you're ready, click the purple button in the upper right that says Share Pictures.
Choose your photos by selecting the checkbox underneath each one. Click the links in the upper right of the album to select all your photos at once. Click Next to set-up or add to a shared photo album. A shared photo album can be very different from your own Shutterfly albums. You can create a single album or start a collection.
Collections are an online album that your friends and family can contribute photos to, and add comments to photos. Your collection has its own web address at Shutterfly. You can set some options for your collection:
- Name
- Title
- Description
- Whether visitors can add photos and albums,
- Whether visitors can add comments
- Receive email when a visitor adds photos or comments
- An optional password to view your collection
Choose an album or add to your collection. Enter some email addresses in this form to invite friends and family to view the photos. Your friends and family do not have to join Shutterfly to view your pictures. This form sends them an email with your optional message and a web link to view your album. By default, Shutterfly will send you a copy of the email. I leave this box checked so I can forward the email later to anyone I didn't include in this form. I also usually let Shutterfly save the names in my address book for future use. From this window, you can also change the order of your photos -click the link to arrange photos.
After you send the invitation, the next page will display a link to the album, so you can copy it or bookmark it.
I bet you can't wait to see Max's album.
|
Max's Album
I cut and pasted the images from Max's Shutterfly album, to add to this review. Trust me, the Shutterfly album is much better. You will have to design your own to enjoy slideshow, add comments and save photos. Try it - it's fun!
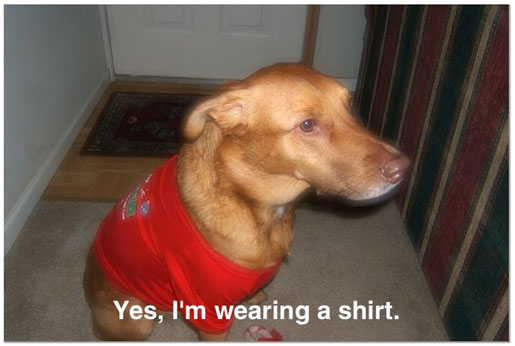
This precocious pup has a "Text Over" caption and "Soft Focus" applied.
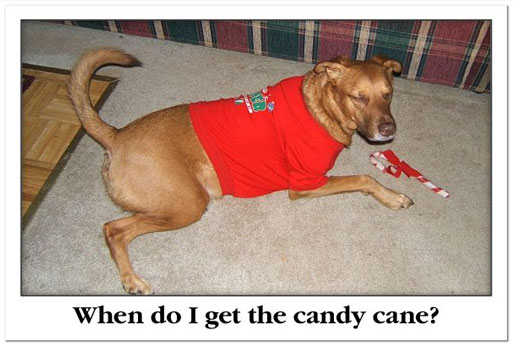
This pose deserved a simple caption called "Black Line"

The "Bottom Caption" adds to the drama, along with a small amount of "Soft Focus."

The "Rounded Rectangle" and "Soft Focus" say so much...

Here's Max with the "Saturate" effect. It added alot of punch to the photo. In the More... category, there are so many Christmas and holiday borders, I had a hard time choosing, but this one makes me smile.
Merry Christmas from Max!
Next we find out how to order prints and send photo gifts to Max's friends.
|
Ordering Prints
New members at Shutterfly receive 15 free prints. Nice. Click the green tab at the top of the page - Order Prints. Click here to go to Shutterfly Prints.
On the next page, there's a link for 'free prints.' It pops up a box that tells you about your current special offers. Be sure to read the dates - it looks like the free prints have to be used within the first 30 days of joining. Let's get going!
The areas in this page - your albums, photos and options should look a little familiar. After you've selected your photos, click the purple button in the upper right - Next.
Here's where you choose your photo sizes and quantities. There's a few great options, too:
- Photo finish - matte or glossy
- Single or double prints
- Sizes from 4x6 up to 20 inches by 30 inches
- Custom message on back of each photo
I love the message feature. You can put a different message on each photo, or add one message to all your prints at one time. When you choose to add a message to all photos, you can replace the messages or just add it to the front of each custom message.
Let's say I had an album of family reunion photos. I type a custom message for each photo, detailing who's who. Then I can use the all at once feature to add "Family Reunion 2005" before my details of aunts, uncles, and cousins. What a great family record!
It gets better - on the next screen, I can send prints to everyone across the country! So I click the purple Next button.
If you have any addresses saved in your address book, they'll show up here. Otherwise, click Add new address to put in everyone's address. Then you'll have it for next time.
Have alot of addresses? Sending Christmas photos or wedding photos? Want to show off the new baby to everyone? There's a link in the right-hand column that lets you import addresses from different programs into your Shutterfly address book. The format for Windows seems to be .CSV, comma separated values. If your program can export or save into that format, you can add lots of addresses all at once. Follow the directions listed here for your software - Outlook, etc.
Select recipients by checking the box next to their name, whether you typed or imported them into your address book.
Click Next and you can review your order. I ordered 7 free prints and paid less than $2 in postage. Great deal!
We're almost done. Shutterfly accepts credit card, check and money order. I entered my info and clicked to place my order.
I received an email order confirmation. Shutterfly lets you cancel your order only within the first 30 minutes of placing your order, so check carefully. Orders are usually shipped in 1-2 business days. They offer a 30 day guarantee on your prints and gifts.
You can check the status of your order as it is processed and shipped. Go to My Shutterfly. At the bottom of the page, under My Account, click Order History. All the info will be right there.
Ordering Photo Gifts
I think I mentioned that I like Shutterfly's photo gifts when I listed them earlier: when I listed them earlier:
But I had missed one of their coolest gifts -
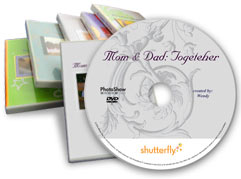 
DVD Photo Slide Show
Add music, titles, borders, transitions and fancy packaging to your photos, and you've got something wonderful for family and friends. With the customizable DVD label and box, it becomes a real keepsake. Plus, they're fun to make.
When you go the DVD Photo Show page, you can watch a few demos. They have sound, so make sure your speakers are on, but not too loud. To start creating a slideshow, click the orange button - Get Started. From there, we'll begin to select our photos. You can also add photos from your computer from a link on this page. Once I added and arranged my photos, a window popped up to ask if I wanted to save. Great feature, in case you get interrupted, and have to come back later.
Next, we'll add the opening titles. The preview window will show your changes and the first slide. Click Preview to restart and see your edits. Quick tip - mute the music by clicking the small volume icon under the preview window. Right near it, there are pause, rewind and fast-forward buttons, too.
Have fun adding transition effects, borders and more in the next page. Choose from dozens of music categories and songs. To accompany Max's photos, I chose "Silent Night." I used the Fades transitions with a delay of 5 seconds.
The final preview on the next page is larger and shows all of your selected photos. I kept mine simple - it looked great and was fun to create. The finishing touch is to choose the packaging style. After that you can pick recipients and order your DVDs.
Hardcover Photo Book
Just a few days ago , I read an article in Money magazine that gave Shutterfly's hardcover photo book a higher grade than any other online photo service. The Wedding Photo Book ordered in the article had 20 pages and a suede cover. Each page can have different layouts and captions. The article said Shutterfly won both on print quality and price.
Custom Digital Photo Calendar
Just had to mention these current deals:
- Buy 1 calendar, get another at 50% off - new member special.
- Current members get 20% off calendars.
The calendars are nice and large, with plenty of space for writing events and info. The calendars are 12 or 18 month, and you have your choice of starting months. Begin by choosing 12-18 photos. They can be arranged in any order. I had alot of fun picking out a cover photo (Max playing in snow) and title - "Max's Year in Pictures." Then, choose recipients, and they're on their way.
Hope you enjoyed our tour of Shutterfly. I had a great time playing with my digital photos. Because there's so much to try at their site, it can get confusing here and there. But I couldn't find anything not to like about Shutterfly. Give it a try and email any comments or questions.
|
|